

What is a Virtual Machine?
How Can I Install One?
If you are here and totally understand the concept of a virtual machine, please feel free to skip forward to the section you need.
Virtual Machine Introduction:
First off, Microsoft does a great job explaining virtual machines here. I am going to quote them (because who am I to change their definition):
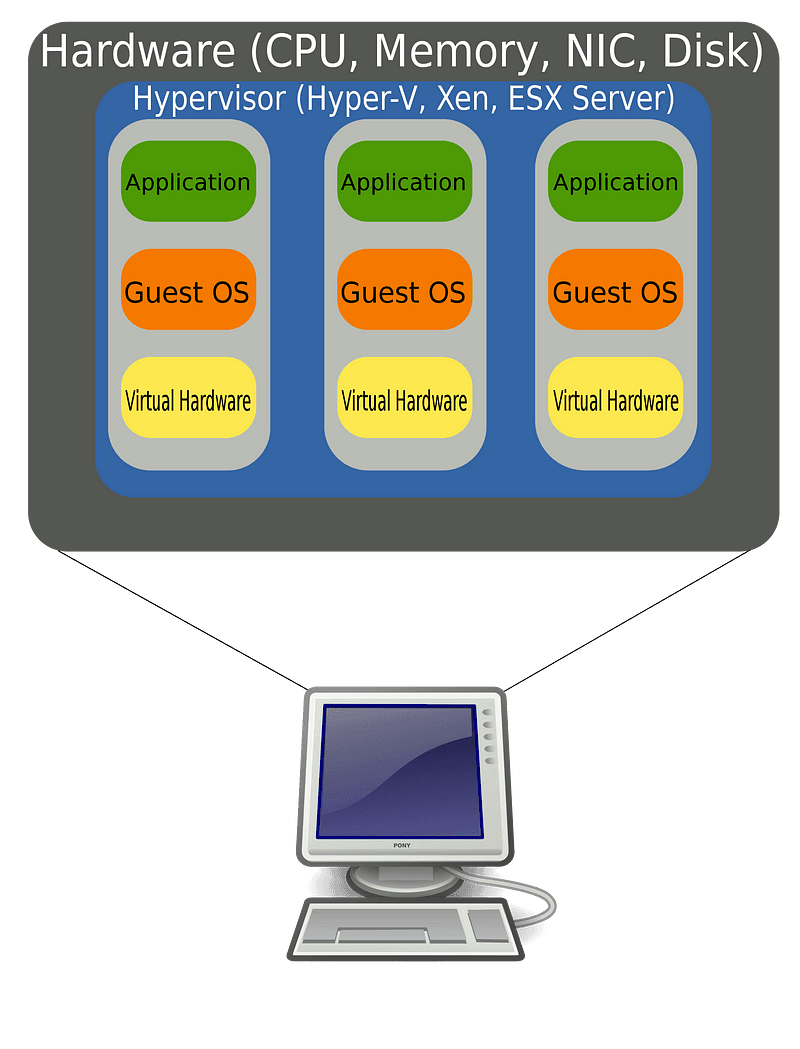
A virtual machine, commonly shortened to just VM, is no different than any other physical computer like a laptop, smart phone, or server. It has a CPU, memory, disks to store your files, and can connect to the internet if needed. While the parts that make up your computer (called hardware) are physical and tangible, VMs are often thought of as virtual computers or software-defined computers within physical servers, existing only as code.
How to Install a Virtual Machine On My Computer?
This is going to assume that you have chosen to go with VMWare Workstation Player/Pro, which at the time of this writing is free from Broadcom. If you want more information on selecting a piece of software for virtualizing on your desktop, check out my write up on it here.
- Go ahead and open up VMWare Workstation. You should have the ISO for Windows
2. Select “Create a New Virtual Machine”

3. Select “Custom (advanced)”, I want to make sure you get the full experience for creating a VM

4. Go ahead and leave the “Hardware Compatibility” unless you have some special use case that requires compatibility with older software.

5. Select “I will install the operating system later”. I want to avoid what VMWare calls “Easy Install”, so you can see the entire process of selecting hardware.

6. Select your Guest operating system.

7. Give your VM a name and specify the location.

8. I default to UEFI, unless I specifically have a reason not to, some operating systems actually require it and Secure Boot.

9. Set processors.

10. Set your memory, you can actually click the numbers on the left to set it for you.

11. Choose the virtual machine network type, there are benefits to each and will be discussed more when we talk about some VM’s that need closed networks.

12. Select I/O controller type.

13. I stick to the default virtual disk type here.

14. Create a new Virtual Disk is generally your safe bet.

15. I stuck to the recommended minimum size, I opt to not allocate the disk space and just let it grow as it needs it. I also opt to split the disk to make it easier to move.

16. Give your virtual disk a name.

17. If all looks good here, click Finish.

18. Now we want to select the ISO file, click on the “CD/DVD” option under devices.

19. Select “Connect at power on” and “Use ISO image file:”. Click Ok.

20. Now you should be able to “Power on this virtual machine” and go through the standard operating system setup and you’re good to go.

How to Install a Virtual Machine on Proxmox?
If you need help setting up Proxmox, check out my write up here.
- Lets navigate to your Proxmox web console, if you get a certificate error go ahead and continue.

2. We are going to start by uploading the Windows 10 ISO (a file that is identical to the disc that Microsoft would sell), you can download it directly from Microsoft here. Head down to the “local (ServerName)” option, click “ISO images” and “Upload”

3. Click “Select File” and “Upload”

4. Head over to the top right corner and click “Create VM”
5. Go ahead and input your VM Name and click Next

6. Select your ISO from the drop down, change type and Version to your respective Operating System, in this case Windows 10 and click Next.

7. Set your disk size, I set mine to 50 and click Next.

8. Select “Sockets” and “Cores”, my server hardware is a bit old and I find that with a Win10 image I do best with 2 cores. Then click Next.

9. Set your “Memory” (RAM), I set mine to 4096 or 4 gigs.

10. Finally select your “Bridge” and click Next. You should get a confirmation page, then click “Finish” if everything matches up with what you intended to select. Congrats! You built your first VM.


11. One last thing though, I don’t like remaking these VM’s every time I need them and I very frequently find myself wanting a different host to experiment on, so we can make them into templates! To do this head to the left side and find the VM you just created, in my case it is Win10Demo, right click the name and select “Convert to Template”

12. You should now see an icon that looks like a piece of paper with a monitor in front of it. You can click on this name and select “Clone”

13. Input your name, and mode. With mode you have 2 options, full clone and linked clone. Proxmox explains them as:
Full Clone
A full clone VM is a complete copy and is fully independent from the original VM or VM Template, but it requires the same disk space as the original.
Linked Clone
A linked clone VM requires less disk space but cannot run without access to the base VM Template.

13. Now you have a fully independent VM. Take a second to congratulate yourself you did something cool!
P.S. I am a week into writing and my newly adopted dog is not impressed…I need to try harder. See you on the next write up!

Mandatory dog tax being paid


